Spider Web Cupcakes
Piping the Perfect Spiderwebs!

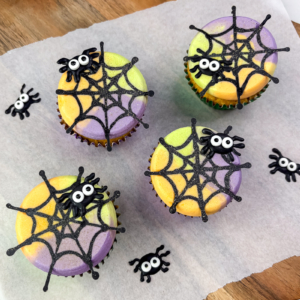
These Spider Web Cupcakes are spooky, sparkly, and surprisingly simple to make! With black candy melt webs layered over colourful buttercream, they’re the perfect mix of creepy and fun. Add a spray of edible glitter and you’ve got a Halloween bake that’s as eye-catching as it is delicious.
Even better, you can pipe perfect webs using my printable Spiderweb Template, so every design turns out neat, even, and oh-so-satisfying
Spider Web Cupcakes Design
These cupcakes are decorated with bold black spider webs that look like they’ve been stamped right onto the buttercream. By piping the webs with candy melts, then flipping the cupcakes upside down onto them before freezing, you get a perfectly flat, neat finish that looks super spooky and unique.
The base is my chocolate cupcake recipe (though any flavour will work). The buttercream is my basic buttercream, tinted with orange, green, and purple gel colours for a bright Halloween swirl. For tips on tinting buttercream, see my how to colour buttercream guide. The webs themselves are made with black candy melts, which set firm and peel away cleanly from parchment once frozen. A final spray of edible glitter makes the spider webs shimmer.
To make the webs, I used my printable Spiderweb Template, which helps you pipe perfect, even webs every time!
You can download it free from my website this weekend, click here to download.

Why You’ll Love These Sparkling Spider Web Cupcakes
-
Surprisingly easy: The flip-and-freeze method does the hard work for you.
-
Show-stopping finish: The stamped webs and glitter sparkle under the light.
-
Halloween ready: The bold colours make them perfect for parties.
-
Customisable: Swap in any buttercream colours or cupcake flavours you like.
-
Beginner-friendly: No fancy piping skills needed — just candy melts and a steady hand.
Things I Used
- Spiderweb Temlplate (A4 + US Letter): Available as a free download this weekend!
-
Chocolate cupcakes: I baked a batch of my chocolate cupcake recipe, but any flavour works for this design.
-
Basic buttercream: My go-to buttercream recipe, coloured with orange, green, and purple gel colours for bold Halloween swirls. See my how to colour buttercream guide for tips.
-
Black candy melts: Melted and piped into spider web shapes. My candy melts guide has all my best melting tricks.
-
Parchment squares: Perfect for piping neat webs and easy to peel off once frozen.
-
Piping bags: One for the candy melts and one for the buttercream — I use disposable for less mess.
-
Large round piping tip (Ateco 809): Gives smooth, clean buttercream swirls without ridges.
-
Baking tray: Keeps the parchment webs flat and easy to transfer to the freezer.
-
Cocktail sticks: Great for fixing or tidying web lines before they set.
-
Edible glitter spray: A fine mist of sparkle makes the webs shine under party lights.

Ingredients
- 12 Chocolate cupcakes
- A batch of my basic buttercream
- Orange gel colouring
- Green gel colouring
- Purple gel colouring
- 1 Cup Black candy melts
- 1 tbsps Vegetable shortening (if using)
- Gold edible glitter
- 24 Mini candy eyes (for the spiders)
Equipment
- A 12 hole cupcake/ muffin tin
- 12 Cupcake cases
- 2 Piping bags
- Cling film
- 1 Extra large round piping tip (Ateco 809)
- A baking tray or board
- Parchment paper (cut into 10 x 10cm squares)
- A small palette knife/ metal spatula
- Cocktail sticks
How to...

Step 1
Place the printed Spiderweb Template on a flat tray or baking sheet, then lay a single sheet of parchment paper over the top. You’ll be able to see the design through the paper to use as a guide. Tip: Secure the corners of your parchment with a little tape if it curls, it makes piping easier!

Step 2
Gently melt the black candy melts in the microwave on a low heat setting, then transfer them into a piping bag.

Step 3
Begin by trimming a small portion from the tip of the piping bag. If the opening is too large, the candy may dispense too fast and be harder to manage. Start piping four overlapping lines onto the parchment paper squares. I made each line around 7cm long.

Step 4
Pipe connecting curves between the lines, starting close to the centre and working outward to build the web. Remember, webs aren’t perfect so have fun. If you make mistakes then you can always remelt the candy and start again. Let them firm up at room temperature, or chill them in the fridge.

Step 5
Divide your buttercream into three portions. Colour one green, one orange, and one purple. Lay out a sheet of cling film and line up the three colours side by side. Roll it into a sausage and twist both ends to seal. Trim one end and place it into a piping bag fitted with an extra-large round tip (Ateco 809). Pipe a smooth dome of the tri-colour buttercream onto each cooled cupcake.

Step 6
Place the buttercream dome face-down onto the candy melts web, pressing gently so it adheres. You should still see the web extending slightly around the sides of the buttercream.

Step 7
Transfer the tray of upside down cupcakes to the freezer for 15 – 20 minutes.

Step 8
Once the buttercream is firm, remove the tray from the freezer and carefully peel away the parchment to reveal the flat, stamped web design on the cupcake.

Step 9
Add a light spray of edible glitter for a dramatic shimmer.

Step 10
If you’re using the bonus spider sheet included with the download, place it under parchment paper the same way as the web template. Pipe the spiders using black candy melts, then add small candy eyes while the chocolate is still soft.
Freeze or refrigerate until set, then carefully peel them off and position one on each cupcake for a fun finishing touch.

The Results!
Well done! You’ve just made your own batch of Spider Web Cupcakes. Bold, colourful, and perfect for Halloween. The tri-colour buttercream combined with the flat stamped candy melt webs create such a cool effect, and that final spray of glitter really makes them sparkle under the light.
Notes & Tips
- Want perfect webs every time? Download my Spiderweb Cupcake Templates
-
Pipe extra webs in case a few break, they’re delicate.
-
If your candy melts are too thick, then follow my guide for working with candy melts.
-
The flip-and-freeze method gives the best flat finish. If the buttercream is peeling off with the paper, pop it back in the freezer.
- Store cupcakes in the fridge but bring to room temp before serving. If you live in a hot climate then keep them chilled.
Serving Suggestions
-
Table centrepiece: Arrange the cupcakes on a serving board with extra chocolate webs and a few plastic spiders.
-
Mix and match: Pair these with my Eyeball Cupcakes and Pumpkin Patch Cupcakes for a full Halloween dessert spread.
-
Trick-or-Treat spread: Serve alongside bowls of Halloween candy for an easy party table idea.
FAQ: Spiderweb Cupcakes
Do I need special tools for this design?
Not at all, a large round piping tip and some parchment paper is all.
Can I make the webs ahead of time?
Yes! Pipe and set the webs up to 1 week in advance. Store them in an airtight container with parchment between layers.
Do I need edible glitter?
No, but it adds a fun sparkle and makes the webs stand out.
Can I use white chocolate instead of candy melts?
Yes, but make sure to temper the chocolate first.
What cupcake flavours work best?
Classic vanilla or chocolate are great neutral bases that let the design shine.
Final Thoughts
Halloween is the perfect excuse to play with bold colours and dramatic designs, and these Spider Web Cupcakes show just how effective a simple technique can be. The flip-and-freeze method gives you a neat, flat stamped finish that looks polished and professional, while the edible glitter adds just the right amount of sparkle.
What I love most about this design is how achievable it is — even if you’ve never piped with candy melts before, the webs don’t need to be perfect to look striking once they’re set onto the cupcakes. It’s one of those little decorating tricks that instantly transforms a plain cupcake into something spooky and spectacular.
Whether you’re serving them at a Halloween party, adding them to a themed dessert table, or just making them for fun at home, these cupcakes are guaranteed to stand out. With their mix of colour, shine, and creepy webs, they’ll have everyone reaching for a second one.
Share Your Creations
I’d love to see how your Spiderweb Cupcakes turn out!
-
Tag me on Instagram @cakedbyrach so I can share your bakes.
-
Or post your cupcakes in the Caked by Rach, Baked by You Facebook group to join our baking community. #CBRBakedByYou
-
If you enjoyed this tutorial, please leave a comment or review on the blog — it helps others find these designs too.
Related Designs
Chocolate Skull Pots
Creepy and fun! These Skull Pot Cupcakes are topped with...
9th Sep 2025
Evil Eye Cupcakes
These Evil Eye cupcakes are a bold and modern design...
5th Sep 2025
Eyeball Cupcakes
These creepy Eyeball Cupcakes are a Halloween showstopper! Candy melt...
9th Sep 2025
Pumpkin Patch Cupcakes
Bright, sparkly Pumpkin Patch Cupcakes that are so easy to...
5th Sep 2025
Related Recipes
Chocolate Chip and Vanilla Cupcakes
Soft and fluffy vanilla cupcakes filled with chocolate chips —...
3rd Aug 2025
Peanut Butter and Jam Cupcakes Recipe
Sweet and nutty peanut butter cupcakes filled with jam —...
20th Jan 2025
White Chocolate and Raspberry Cupcakes
Creamy white chocolate paired with tangy raspberry jam in a...
3rd Aug 2025
Lemon Cupcakes
Soft, fluffy lemon cupcakes made with fresh zest and juice...
20th Jan 2025