Mini Cookie Monster cupcakes
Bite-sized cupcakes with cookies, candy eyes, and cheeky smiles — a fun bake for any celebration.
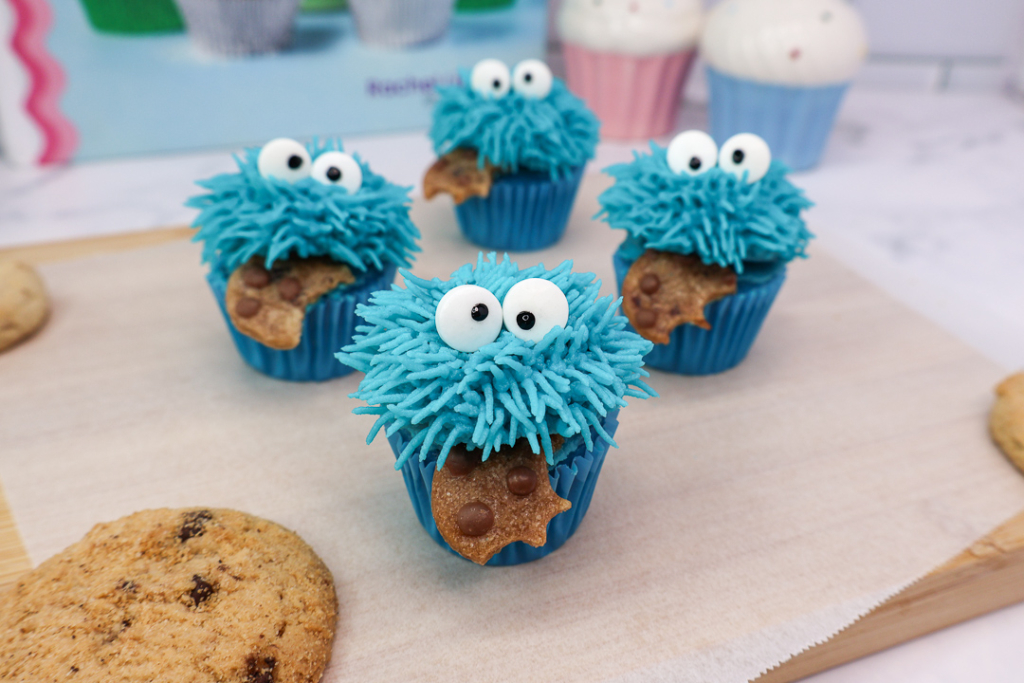
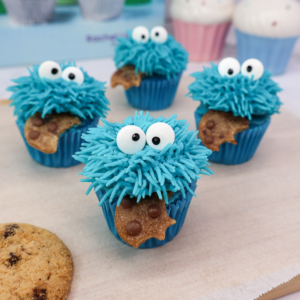
These mini Cookie Monster cupcakes are as fun to make as they are to eat! With big googly eyes, cheeky smiles, and mini cookies in their mouths, they’re guaranteed to get a laugh at any party. Their bite-size makes them perfect for kids’ parties, bake sales, or just a playful afternoon treat.
The Design
The design is simple but effective: smooth blue buttercream piped onto mini cupcakes, with candy eyes and a cookie nestled into the “mouth.” The large round piping tip gives Cookie Monster his signature round face, while a spatula helps smooth the buttercream before adding details. A mini cookie completes the look — and makes each bite even more fun
Why You’ll Love This Cookie Monster Design
-
Adorable bite-sized cupcakes that are fun for all ages.
-
Perfect for birthdays, school events, or bake sales.
-
Easy to decorate with simple piping and sprinkles.
-
Everyone gets their own mini cookie — the best part!
Things I Used to make Mini Cookie Monster Cupcakes
-
Mini cupcake tin + liners – I used mini blue liners from Wilton, they are the perfect match
-
Piping bags – Reusable or disposable both work fine.
-
A grass piping tip (Wilton 233) – Perfect for creating the Cookie Monster’s fur.
-
Small offset spatula – Helps smooth the buttercream before adding the cookies
-
Candy eyes – You can buy ready-made ones, or make your own using fondant circles and mini black sprinkles.
-
Mini cookies – I used homemade mini chocolate chip cookies, but store bought work perfect.
-
Blue food colour – I recommend a gel-based brand like Wilton or AmeriColor for a vibrant Cookie Monster blue. See my Buttercream Colouring Guide for more tips on achieving bold colours.
Serving Ideas
-
Perfect for kids’ birthday parties — fun, bite-sized, and guaranteed to make the little ones laugh.
-
Add them to a dessert table alongside other character cupcakes for a playful theme.
-
Great for school bake sales — mini size makes them easy to package and sell.
-
Pair with a glass of milk for the full Cookie Monster effect!
Frequently Asked Questions
Can I make these full size?
Yes — the design works just as well on standard cupcakes. You’ll just need bigger cookies and eyes.
Do I need special piping tips?
Yes. A grass piping tip gives the best effect.
Can I make them ahead of time?
Yes. Decorate the cupcakes the day before and keep them in an airtight container. Add the cookies just before serving for the crunchiest texture.
Final Thoughts
These mini Cookie Monster cupcakes are always a crowd-pleaser — cheeky, fun, and delicious. Perfect for kids, parties, or just a bake that’s guaranteed to make people smile.
Ingredients
- 12 mini cupcakes (coloured blue, optional)
- 2 cups basic buttercream
- Blue food gel
- 24 candy eyes
- 12 mini cookies
Equipment
- 12-cup mini cupcake pan
- 12 mini blue cupcake liners
- 1 piping bag
- 1 small grass piping tip (Wilton 233)
- A small serrated knife
- Tweezers
How to...
Step 1
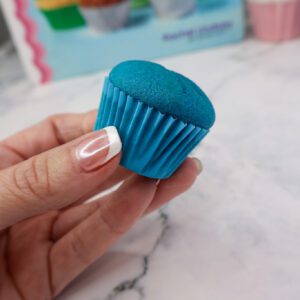
Add a few drops of blue food gel to your cupcake batter, you don’t need much to achieve a bright colour. Ensure the food gel is evenly mixed throughout the batter to achieve a consistent hue in all cupcakes. Fill liners ¾ full to get round domes on the cupcakes. Bake according to the recipe’s instructions. Allow the cupcakes to cool in the tin for 5 minutes before transferring them to a wire rack to cool completely.
Step 2
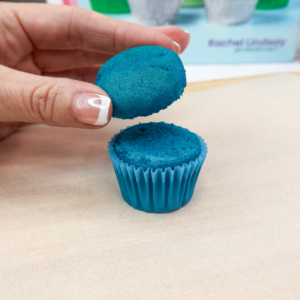
Allow the cupcakes to cool completely before removing the dome. Chilling the cupcakes slightly beforehand can result in a cleaner cut. Use a small, serrated knife to remove the tops of the cupcakes and set them aside.
Step 3
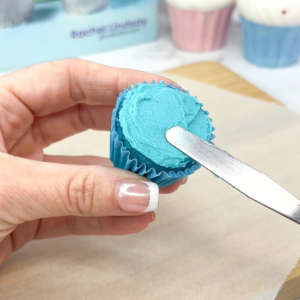
After trimming the tops of the cupcakes, the next step is to prepare the buttercream for decorating. Add a few drops of blue food colouring gel to the buttercream and mix thoroughly until the colour is evenly distributed. Use a small palette knife to apply a thin layer of blue buttercream to the bottom half of the cupcakes.
Step 4
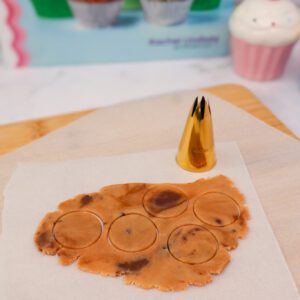
I made my own miniature cookies using some store-bought cookie dough that I already had in the fridge. I cut them into circles using a small piping tip. I also cut small bite marks in some of the cookies and added melted chocolate dots after baking. If you can find mini cookies at the supermarket then they would work perfectly and save you some time.
Step 5
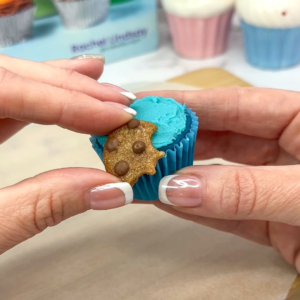
Place a cookie on top of the cupcake, using a small amount of buttercream to secure it if necessary. Position the dome lids over the cupcakes, applying additional buttercream to ensure they remain in place.
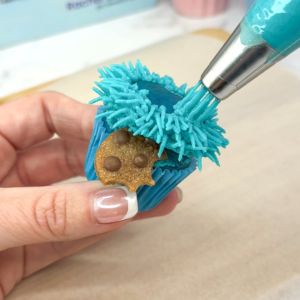
Step 6
Add the rest of the blue buttercream to a piping bag, fitted with piping tip 233. Start at the edges and work your way into the centre. Hold the piping bag upright with the tip touching the cupcake. Squeeze out some buttercream and then pull away, releasing the pressure when you have the length of fur desired.
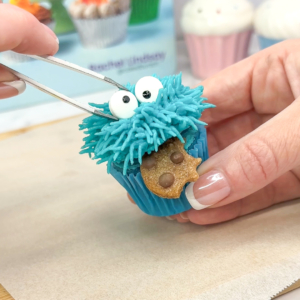
Step 7
Once the blue buttercream has been evenly piped across the cupcake tops, it’s time to bring the little blue creatures to life. Use tweezers to carefully place two candy eyes on each cupcake, ensuring they are slightly tilted for that playful, mischievous look. Gently press the eyes into the frosting so they adhere securely without sinking too deeply. This step transforms the cupcakes into charming characters, each with a personality of their own.
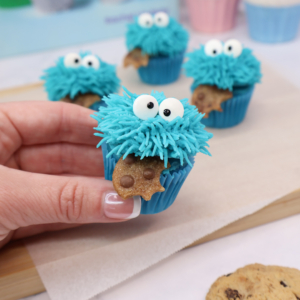
The results
Serve these mini cupcakes at your next party. Whether displayed on a dessert table or handed out individually, they are guaranteed to bring some smiles. Perfect for any occasion, these cupcakes will be the star of your celebration!
Notes & Tips
- I always use gel colours to colour my batter and my buttercream; you only need a few drops to achieve a bright and vibrant colour. If you don’t want to use too much colour, you could just colour the buttercream and keep the cupcakes plain.
- To achieve a domed top on your cupcakes, fill the liners ¾ full of batter.
- Food colour deepens over time. When incorporating it into batter and buttercream, start with a small amount and mix thoroughly. It will become more intense, so avoid adding more than necessary.