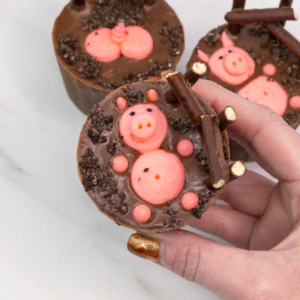
Pigs in Mud Cupcakes
Cheeky cupcakes with pink buttercream pigs and glossy chocolate ganache mud baths — fun for birthdays and parties.
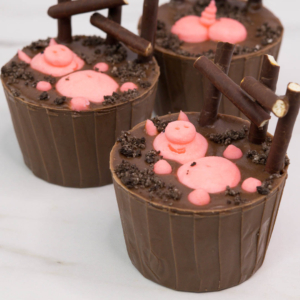
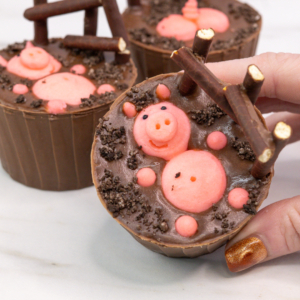
These pigs in mud cupcakes are cheeky, chocolatey, and guaranteed to get a laugh! With little pink pigs lounging in chocolate “mud,” they’re a fun design that’s perfect for birthdays, themed parties, or just when you want to impress with something playful.
Design
The look starts with homemade chocolate cupcake cases, filled with cupcakes and topped with smooth chocolate ganache. Pigs are piped from pink buttercream — two dots form the body and head, with smaller details added for ears, snouts, and trotters. Mini black sprinkles make the eyes, and a cocktail stick is used to add nostrils and belly buttons.
The chocolate “mud” gives a glossy finish, while crushed Oreo crumbs sprinkled around the edges make the mud bath even more realistic. The result? A whole pen of pigs relaxing in their chocolatey spa!
Why You’ll Love These Cupcakes
- Creative and fun – they look like tiny edible pig pens.
- Combines chocolate, buttercream, and ganache for the ultimate indulgence.
- Impressive centrepiece cupcakes that are surprisingly achievable with simple tools.
Things I Used
Here are the tools and ingredients I used to bring these cupcakes to life. If you’re recreating them, these links will make it easy:
- Cupcake tin + liners – Standard 12-hole tin
- Piping bags – Reusable piping bags
- Large round piping tip – Wilton 2A for pig heads and bodies
- Small round piping tip – Wilton 10 for snouts, ears, and trotters
- Tweezers – Food-safe tweezers for adding details
- Small spoon – A spoon for smoothing buttercream and chocolate
- Saucepan – Small saucepan for heating cream
- Candy melts – Milk chocolate candy melts for chocolate wrappers
- Pocky sticks – Chocolate Pocky for the fences
- Sprinkles – Mini black sprinkles for the eyes
- Oreos or chocolate biscuits – Crushed cookies for “mud” texture
- Pink gel food colour – Piggy pink colouring for buttercream

Ingredients
- 12 Cupcakes
- 1 cup of my basic buttercream
- 1 cup Chocolate buttercream
- Candy melts (milk chocolate)
- Pink gel food colour
- 24 chocolate pocky sticks
- 200g Milk chocolate (finely chopped
- 60ml Heavy cream
- 24 mini black, round sprinkles
- 4 Oreo biscuits, crushed into crumbs
Equipment
- 12 Hole cupcake tin
- 12 baking cups/ liners
- 3 piping bags
- 1 large round piping tip (Wilton 1A)
- 1 small round piping tip (Wilton 10)
- Cocktail sticks
- Tweezers
- A small spoon
- saucepan
How to...

Step 1
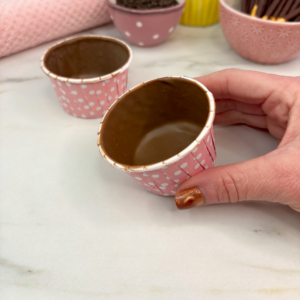
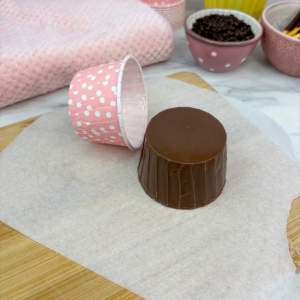
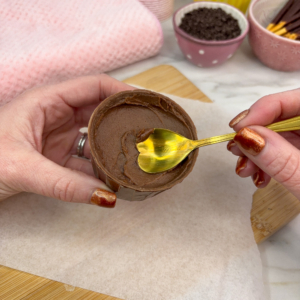
Gently melt the chocolate candy melts in the microwave, using a low heat setting (see notes) Pour approximately 1 tablespoon of the melted candy melts into each liner. Use the back of a small spoon to spread the chocolate up the sides. Continue this process until all liners are coated with the chocolate. Allow the liners to sit at room temperature to set.
Step 2
Apply a second layer of candy melts, then transfer the pan to the refrigerator until the chocolate is fully set, which takes about 15 minutes.
Step 3
Once set, remove the cupcake pan from the refrigerator and gently peel the liners away from the chocolate cases. Using tweezers to start tearing the liner makes removal easier.

Step 4
Carefully remove the baked cupcakes from their liners. I recommended baking them in liners that match the size used for the chocolate wrappers. Trim a little off the top of the cupcakes and push them into the chocolate wrappers. Remember to leave a gap (approximately a 1cm) at the top to add the pigs and the ganache.
Step 5
Add a layer of chocolate buttercream onto the top of the cupcakes and smooth it out using the back of a spoon.
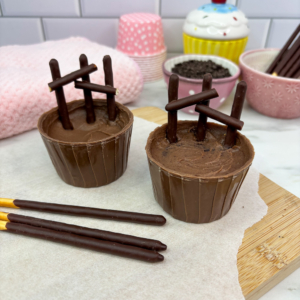
Step 6
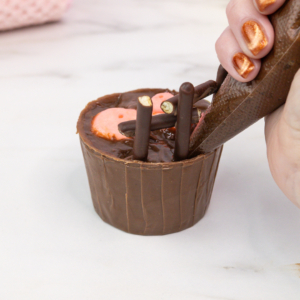
To make the fences, cut the chocolate pocky sticks in half and push three into each cupcake for the fenceposts. Cut the remaining 12 pocky pieces in half again and use a little melted chocolate to attach them to the fenceposts.
Step 7
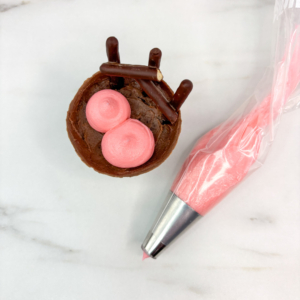
Add a few drops of pink gel colour to the buttercream and mix it in. Once you reach the perfect pig colour (whatever that is) then you can add it to your piping bags. Add half of the buttercream to a piping bag fitted with a large round tip (1A) and the remaining half to a piping bag fitted with a smaller round tip (10)

Step 8
Time to pipe the pigs. Use the larger tip to pipe two dots for the head and the body. Remember that we will be filling the gap with ganache, so the dots need to be high enough to peep out of the top. Use the smaller piping tip to add a snout and two pointy ears. Use the pointy end of a cocktail stick to poke two holes in the snout and a belly button. Use tweezers to add two small black sprinkles for eyes and score a little smile using the cocktail stick. Transfer them to the fridge to chill.
Step 9
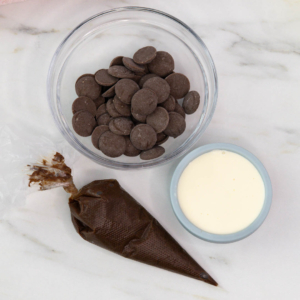
To make the ganache, place the chopped chocolate into a bowl. Heat the heavy cream in a saucepan over medium until hot (not boiling), then pour it over the candy melts. Let it sit for a few minutes, then stir until smooth. Transfer the ganache to a piping bag.
Step 10
Remove the chocolate pots from the fridge, cut a small hole in the end of the piping bag and fill the gaps with chocolate ganache. Move the pots back into the fridge to allow the ganache to set.
Step 11
Once set, I added four dots for the trotters, using the small piping tip. If you are using the crushed-up Oreos, sprinkle them around the edges.
The results!
Well done — you’ve just created the cutest little Pigs in Mud cupcakes! The combination of rich chocolate buttercream, playful piggies, and the muddy swirl makes these cupcakes as fun to look at as they are to eat. They’re perfect for farm-themed parties, kids’ birthdays, or just when you want to bake something that makes people smile.
Snap a photo of your cupcakes and share them with me — I’d love to see your creations!
Notes & Tips
- Let the chocolate cups set at room temperature between coats and then chill them when they are ready. This is to prevent them from breaking when removing the liners.
- Pipe piggies slightly higher than the cupcake edge so they peek out of the “mud.”
- Colour buttercream with a touch of pink gel food colour (see my Buttercream Colouring Guide for tips).
- Chill the cupcakes briefly after adding buttercream pigs so they hold their shape before filling with ganache.
- For neat chocolate cases, build up the layers of candy melts in two coats.
Serving Ideas
- Display on a farmyard-themed dessert table with cow or sheep cupcakes.
- Use as a quirky birthday cake alternative for animal lovers.
- Gift them in individual treat boxes as party favours.
- The chocolate “mud” gives a glossy finish, while crushed Oreo crumbs sprinkled around the edges make the mud bath even more realistic. The result? A whole pen of pigs relaxing in their chocolatey spa!
Frequently Asked Questions
Can I use fondant instead of buttercream for the pigs?
Yes — fondant works too, though buttercream makes them softer and cuter.
Do I need to make the chocolate cases?
No — you can use regular cupcake liners, but the chocolate cases give a more realistic “mud bath” effect.
Can I make these ahead of time?
Yes. Bake cupcakes and make pigs the day before, store in the fridge.
Final Thoughts
These piggy mud bath cupcakes are funny, chocolatey, and a guaranteed hit with both kids and adults. They’re simple to put together but make a big impression — the perfect bake to bring to any party.
Share Your Creations
I’d love to see how your Pigs in Mud Cupcakes turn out!
- Tag me on Instagram @cakedbyrach so I can share your bakes.
- Or post your cupcakes in the Caked by Rach, Baked by You Facebook group to join our baking community.
If you enjoyed this tutorial, please leave a comment or review on the blog — it helps others find these designs too.